Properties Panel Controls
The properties panel is where you can access the Performance and Lip sync controls. They are:

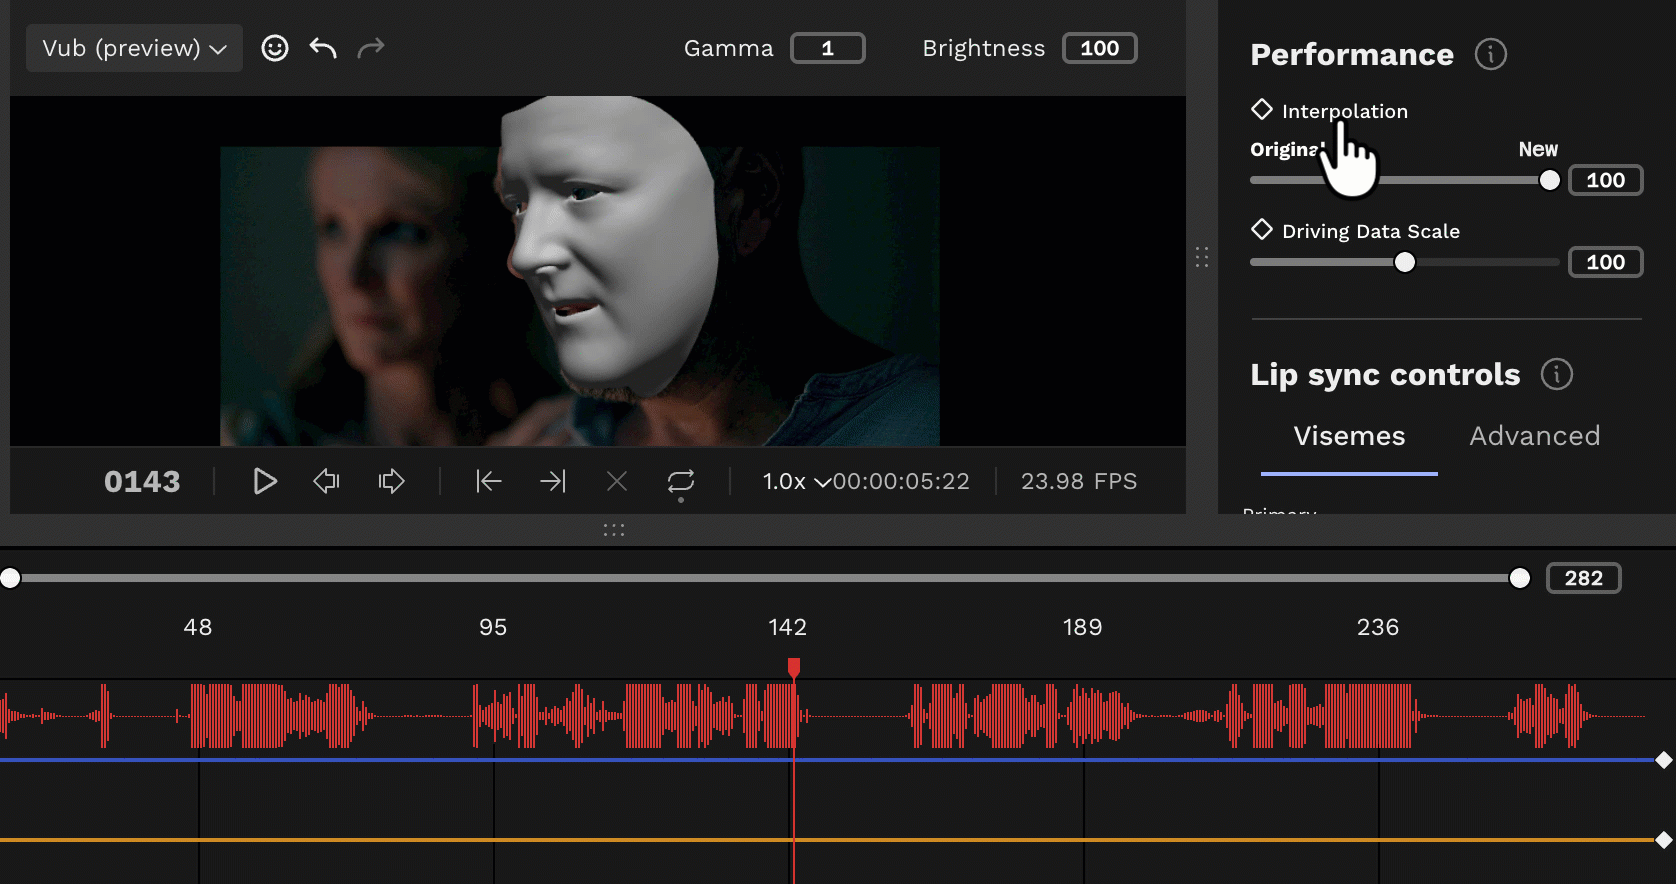
Performance Controls
Interpolation - allows you to define how much of the new performance (the Driving Data) is transferred to the shot.
Driving Data Scale - allows you to control performance size, effectively acts as a ‘multiplier’ of the articulation from the driving data.
Lip Sync Controls
The lip sync controls allow you to adjust the mouth movements of an actor to achieve perfect lip sync. You can do this using Visemes and Advanced Controls (blendshapes).
Visemes - your primary controls - intuitive presets for the mouth shapes needed for key sounds. This allows you to work faster and focus on performance rather than specific facial anatomy.
- For the majority of shots, Visemes will meet your refinement needs.
Advanced (blendshape) controls - granular controls for specific parts of the face. These should only be used in cases where the Viseme controls do not achieve the desired result.
All these adjustments are made by the addition of keyframes.
Working with Visemes
Adding a Viseme
Before you add a viseme, check out our page on how to assess a vub. If you have identified frames where you want to alter the mouth shape, proceed with the following steps.
- Move the playhead to the frame you want to adjust.
- In the panel on the right, select the viseme that matches the dialogue on that frame.
- Click the viseme button to add it to the timeline.
The viseme appears on the timeline (at the value of 0%) where the playhead is positioned.
To help maintain smooth motion, neutral anchor keyframes (at the value of 0%) are automatically added three frames either side of the viseme.
Under the hood, the correct combination of facial movements for that viseme are activated (but not yet adjusted).
Removing a Viseme
To remove a viseme:
- Select the viseme keyframe (and its neutral anchors).
- Press Backspace / Delete.
This removes the viseme and all associated adjustments from the timeline.
Adjusting a Viseme
Each viseme has a strength value, allowing you to fine-tune how pronounced the mouth shape appears.
- Visemes are added at 0% strength by default
- Strength can be adjusted from -300% to +300%
To adjust strength:
- Hover over a viseme keyframe to view its current value.
- Select the keyframe or move the playhead to the viseme and click the viseme button
- Use the Up / Down arrow keys to increase or decrease strength.
The on-screen face preview updates in real time as you adjust.
Negative values can be useful for softening or inverting a mouth shape, while higher values exaggerate articulation.
Moving a Viseme in Time
By default, a viseme is placed at the current playhead position. You can reposition it at any time:
- Select the viseme keyframe (and anchors if needed).
- Use:
- Left / Right arrows to move frame-by-frame
- Shift + Left / Right to move in larger steps
Follow the Mouth Shapes guide to learn how to refine mouth shapes using visemes.
Advanced Controls (Optional)
For cases where additional adjustment is required, you can access Advanced Controls by clicking the Advanced tab in the Lip Sync controls panel.
This reveals individual facial controls such as mouth, jaw, and nose adjustments.
Viseme-driven adjustments remain active, even though their underlying values are not displayed on the timeline. Any advanced adjustments you add act as overrides, layered on top of the viseme. This allows for precise tweaks without losing the simplicity of the viseme workflow.
Follow our Advanced Lip Sync Controls guide to learn how to fine-tune each mouth shape using the advanced controls.
How to Apply Advanced Lip Sync Controls
- Move the playhead to the frame you’d like to adjust.
- Add a keyframe to the blendshape you need to edit
-
Add a keyframe before and after that frame to define the start and end points of the adjustment. Set these keyframes sufficiently far apart to avoid sharp, sudden movements caused by your adjustment.
Working with Keyframes
Keyframes are applied to the timeline to adjust lip sync.
Keyframe additions / adjustments are applied where your playhead is resting in the timeline.

To add or adjust keyframes in your timeline and therefore make adjustments to your lip sync, you can use one of three methods – clicking a keyframe icon, adjusting a slider or directly entering a numeric value.
Keyframe Buttons
Click the diamond icon next to a Performance Property, Viseme or Advanced Control blendshape to generate a keyframe with a value of 0. Click again to remove the keyframe.
The diamond icons appear:
Filled - when your playhead sits over an existing keyframe.
Outlined - when there is no keyframe in the playhead position.
Adjusting a slider
The keyframe values of Performance Properties (such as Interpolation and Driving Data Scale) and Advanced Controls blendshapes (such as Jaw - Open, Mouth - Funnel, etc.) can be controlled with sliders.
Click and drag a slider to add or adjust keyframes.
Double-click on the round slider marker to reset the value to 0.

Entering a numeric value
Type in a numeric value, positive or negative, to add or adjust a keyframe.

Keyframe Shortcuts / Hotkeys
Click + drag = create a ‘lasso’ in the timeline to select multiple keyframes simultaneously.
Select a keyframe and:
- Delete/backspace = remove keyframe(s).
- Right arrow/left arrow = move keyframe(s) left or right by one frame.
- Right arrow/left arrow + shift = move keyframe(s) to left or right by 10 frames.
- Up arrow/down arrow = increase/decrease keyframe(s) value by one.
- Up arrow/down arrow + shift = increase/decrease keyframe(s) value by 10.
You can adjust multiple blendshapes on the same frame, but apply sparingly and only when necessary: too many overrides can cause an inorganic result.
To render your adjustments, click Render Changes.
Note: Applying a negative value to a blendshape control will make an adjustment that is the opposite of that blendshape’s description. For example:
- Setting Jaw - Open to -10 will close the jaw.
- Setting the Mouth - Funnel to -10 will make the lips flatter and less round.
Read next: Refinement Interface - Timeline