Table of Contents
Overview
Why Viseme-Based Refinement?
Adding Visemes
Adjusting Viseme Keyframes
When to Use Visemes vs Advanced Controls
Overview
Viseme-based refinement is the primary way to adjust mouth shapes and speech performance inside DeepEditor.
Instead of manually combining individual facial controls, refinement is now performed using visemes - the mouth shapes used to form sounds such as M, B, P, Ah, Ee, Oh, etc.
This approach allows you to work faster and focus on performance rather than technical facial anatomy. Advanced blendshape controls are still available for cases where viseme refinement does not achieve the desired result.
Why Viseme-Based Refinement?
Viseme-based refinement is designed to make dialogue adjustments faster and more intuitive for editorial teams, without requiring specialist animation knowledge.
Key advantages:
- Faster adjustments
Apply a complete mouth shape with a single action instead of adjusting multiple controls. - Cleaner timelines
Refinement timelines stay readable and focused on speech content. - Performance-first workflow
Think in terms of dialogue sounds, not facial mechanics. - Consistent results
Each viseme applies a carefully tuned combination of facial movements under the hood.
For most refinement tasks, visemes alone will be sufficient. Advanced controls remain available when deeper adjustment is required.
If you’re not familiar with the refinement interface, please see this knowledge base page.
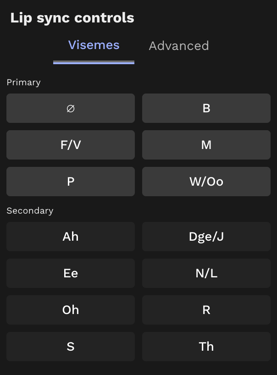
Adding a Viseme
Before you add a viseme, make sure you are familiar with the Refinement Process and have completed steps 1 to 4. Improving lip sync using visemes is part of step 5 in the Refinement Process - the Mouth Shape Pass.
If you have identified frames where you need to alter the mouth shape, proceed with the following steps.
- Move the playhead to the frame where you want to adjust the mouth shape.
- In the panel on the right, identify the viseme that matches the dialogue sound.
- Click the viseme button to add it to the timeline.
A viseme keyframe appears on the timeline (at the value of 0%) where the playhead is positioned. To help maintain smooth motion, neutral anchor keyframes (at the value of 0%) are automatically added three frames either side of the viseme.
Adjusting Viseme Keyframes
Viseme Strength
Each viseme has a strength value, allowing you to fine-tune how pronounced the mouth shape appears.
- Visemes are added at 0% strength by default
- Strength can be adjusted from -300% to +300%
Note that the value of the neutral keyframes either side of the viseme cannot be adjusted, but they can be moved along the timeline.
To adjust strength:
- Hover over a viseme keyframe to view its current value or you can move the playhead to the keyframe and click the button of the viseme you're on to highlight and adjust it.
- Select the keyframe by clicking on it or lassoing it.
- Use the Up / Down arrow keys to increase or decrease strength.
The grey face preview updates in real time in the Main Viewer as you adjust the viseme keyframe value.
Negative values can be useful for softening or inverting a mouth shape, while higher values exaggerate articulation.
Moving a Viseme in Time
By default, a viseme is placed at the current playhead position. You can reposition it at any time:
- Select the viseme keyframe (and anchors if needed).
- Use:
- Left / Right arrows to move frame-by-frame
- Shift + Left / Right to move in larger steps
Removing a Viseme
To remove a viseme:
- Select the viseme keyframe (and its neutral anchors).
- Press Backspace / Delete.
This removes the viseme and all associated adjustments from the timeline.
Alternatively, individual keyframes can be selected and removed one at a time. Please see the advanced controls section for more detail.
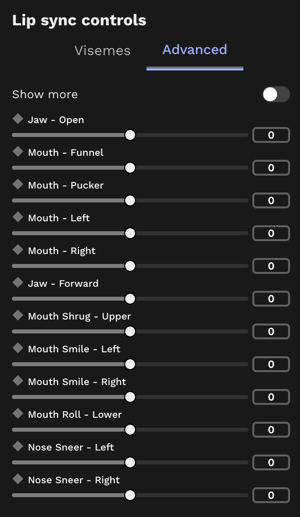
Advanced Controls (Optional)
For cases where additional adjustment is required, you can access the Advanced Controls. These are individual, granular blendshape controls that allow you to finetune mouth shapes. These should be used sparingly and with caution, and only when viseme adjustments are insufficient.
- Click the Advanced tab in the toolkit - this reveals individual facial controls such as mouth, jaw, and nose adjustments.
- Move the playhead to the frame you’d like to adjust.
- Add a keyframe for your selected blendshape.
- Add a keyframe before and after that frame to define the start and end points of the adjustment. Set these keyframes sufficiently far apart to avoid sharp, sudden movements caused by your adjustment.
You can adjust multiple blendshapes on the same frame, but apply sparingly and only when necessary: too many overrides can cause an inorganic result.
To render your adjustments, click Render Changes.
Note: Applying a negative value to a blendshape control will make an adjustment that is the opposite of that blendshape’s description. For example:
- Setting Jaw - Open to -10 will close the jaw.
- Setting the Mouth - Funnel to -10 will make the lips flatter and less round.
It is strongly recommended that you experiment with each blendshape by moving its slider in both the positive and negative directions to see how it affects the PT Result grey face.
Visemes can be used in combination with individual blendshape adjustments. This allows for precise tweaks without losing the simplicity of the viseme workflow.
When to Use Visemes vs Advanced Controls
Use visemes when:
- Adjusting dialogue clarity or sync
- Polishing speech performance
- Making quick, readable changes
Use advanced controls when:
- The viseme controls have not achieved the desired result
- Making very specific facial adjustments
- Correcting edge cases
- Layering subtle refinements on top of a viseme
For most workflows, visemes will cover the majority of refinement needs.
If you need help, please contact us at support@flawless.app.
Read Next: Refinement Process Step 5: Advanced Lip Sync Controls